User Guide
Welcome to WedLog
Wedding planning made simple
WedLog is a lightweight and powerful wedding planning application designed to help brides and grooms manage important details about their wedding. By simplifying the complexities of wedding planning, WedLog offers an intuitive and stress-free experience guaranteed to streamline the planning process. Tailored for keyboard-based interaction, WedLog ensures optimized usability through efficient input typing.
Here's a quick summary of what WedLog can do for you:
- View, categorise and update information about guests and vendors
- Filter guests by table number, tags and more
- Track key statistics (eg. number of guests RSVP-ed)
- How to Use This Guide
1.1 Notations Used in This Guide
1.2 New Users
1.3 Experienced Users - Getting Started
- Understanding the WedLog Interface
3.1. User Input and Feedback
3.1.1. Command box
3.1.2. Result display
3.2. Lists
3.2.1. Guest list
3.2.2. Vendor list
3.3. Quick View Panel
3.3.1. RSVP Status panel
3.3.2. Dietary Requirements panel
- WedLog Tutorial
4.1. Clearing guests and vendors
4.2. Adding a guest
4.3. Editing a guest
4.4. Filtering guests
4.5. What's next? - Features
5.1. Add Command
5.1.1. Adding a guest:guest add
5.1.2. Adding a vendor:vendor add
5.2. Delete Command
5.2.1. Deleting a guest:guest delete
5.2.2. Deleting a vendor:vendor delete
5.3. Edit Command
5.3.1. Editing a guest:guest edit
5.3.2. Editing a vendor:vendor edit
5.4. List Command
5.4.1. Viewing all guests:guest list
5.4.2. Viewing all vendors:vendor list
5.5. Filter Command
5.5.1. Filtering guests:guest filter
5.5.2. Filtering vendor:vendor filter
5.6. General Commands
5.6.1. Viewing help:help
5.6.2. Undoing last action:undo
5.6.3. Redoing last action:redo
5.6.4. Clearing guests and vendors:clear
5.6.5. Exiting the program:exit - FAQ
- Known Issues
- Future Implementations
- Command Summary
- Appendix: Acceptable values for parameters
1. How to Use This Guide
1.1 Notations Used in This Guide
Coloured boxes are used throughout this guide to provide additional information for your reference.
These are details about the parameters that are included for your convenience.
These are useful tips that you should take note of when using this command/feature.
These are alerts which you should take note of when using this command/feature.
1.2 New Users
If you are new here, welcome to WedLog!
Before you embark on your wedding planning journey, check out our getting started guide for a step-by-step guide to download WedLog.
Once you have set up WedLog on your computer, proceed to the understanding the WedLog interface section for a quick tour of the WedLog interface.
Finally, head over to our WedLog tutorial to take your first steps to plan your wedding.
1.3 Experienced Users
If you have some experience with WedLog, welcome back!
For a quick overview of WedLog's commands, jump straight to our command summary.
If you would like a detailed look into each of the features WedLog has to offer, visit the features section of this guide.
2. Getting Started
Ensure you have Java version
11or above installed in your Computer.- You may refer to this guide to check the Java version running on your computer.
- If your computer is not running Java version
11or above, you may download it from here.
Download the latest
wedlog.jarfile by clicking here.Move the
wedlog.jarfile to the folder you want to use as the home folder for WedLog. You are encouraged to create a new folder specifically for WedLog and to move thewedlog.jarfile into that folder. All data created by WedLog will be stored in this folder.Open the WedLog application by double-clicking on the
wedlog.jarfile. If this does not work, open your computer's terminal, navigate to the folder containingwedlog.jar, and typejava -jar wedlog.jarto start the application.A window similar to the one below should appear in a few seconds. Note how the app contains some sample data.

Once you have set up WedLog on your computer, take a quick tour of the WedLog interface in the next section.
3. Understanding the WedLog Interface
In this section, we give a comprehensive breakdown of the WedLog interface, offering insights into its intuitive design and functionality. Explore the components below to gain a comprehensive understanding of how WedLog simplifies wedding planning.
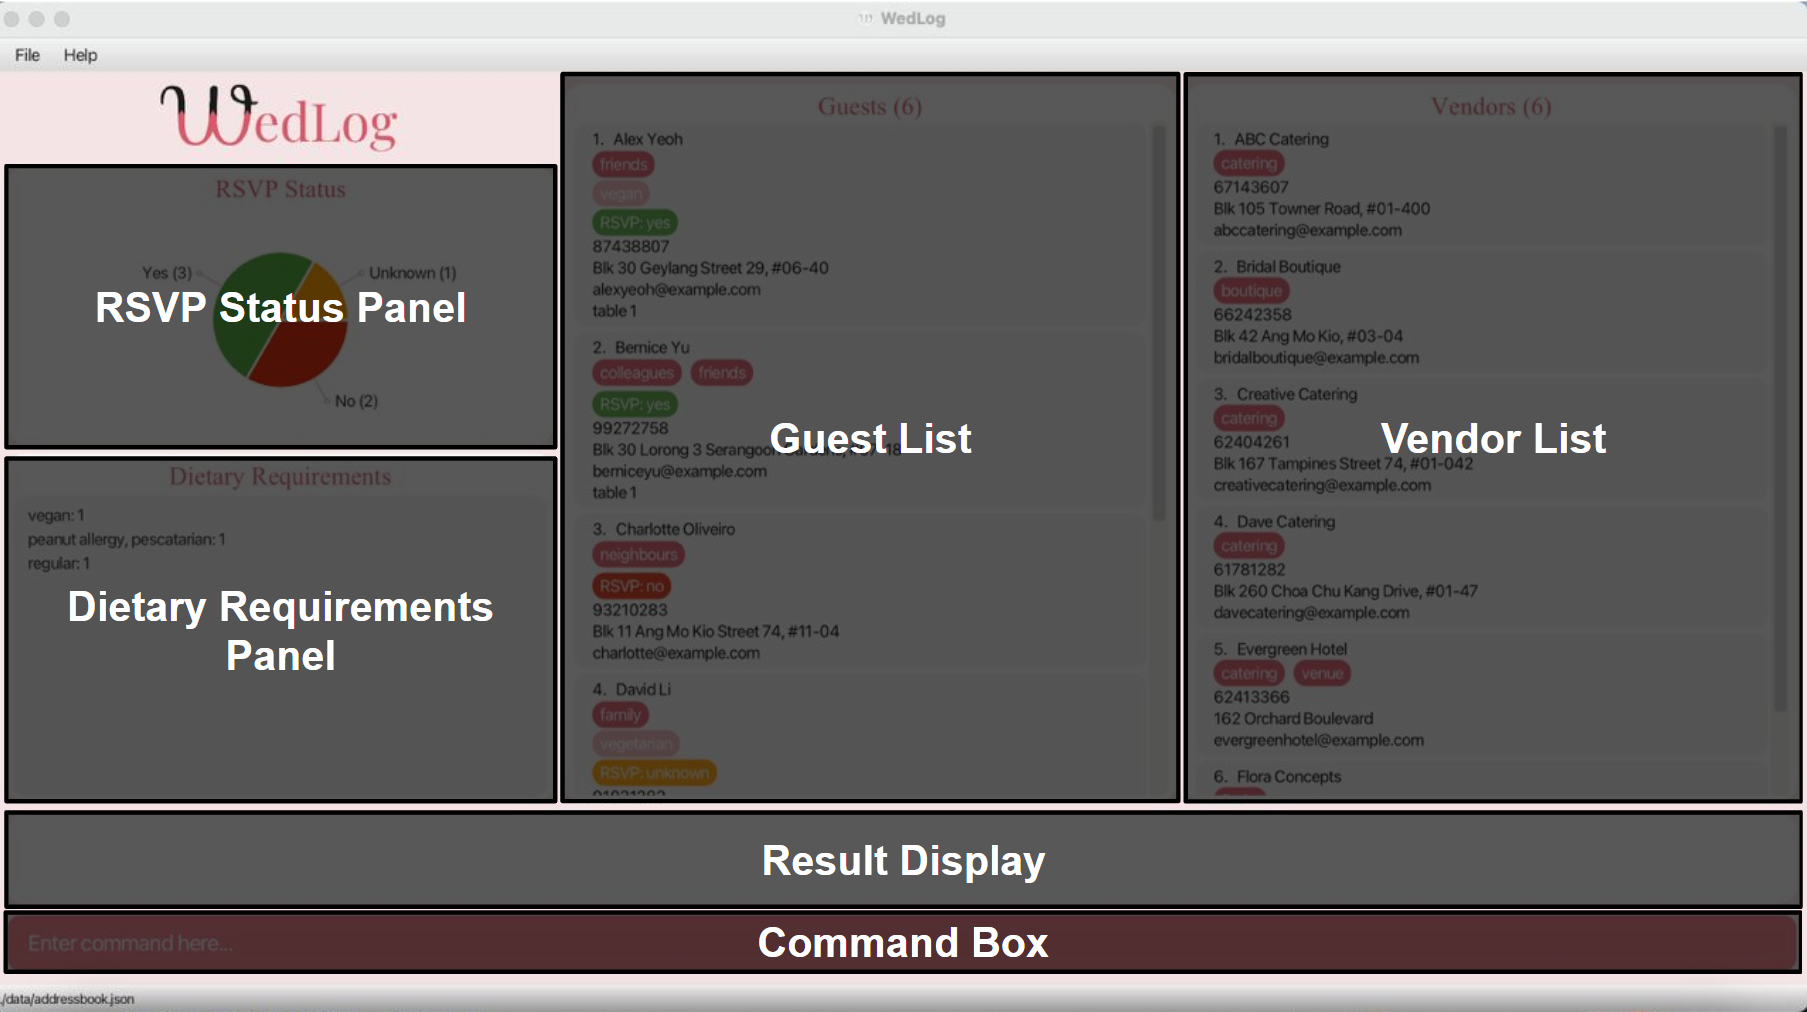
3.1. User Input and Feedback
WedLog is optimised for keyboard-based interaction to enhance the efficiency of your wedding planning process. This interaction is facilitated by the command box and result display boxes.

3.1.1. Command box
The command box is the gateway for you to interact with WedLog, allowing you to seamlessly execute various functions. Simply type a command in the command box and press Enter to execute it.
3.1.2. Result display
Complementing the command box is the result display, where WedLog presents relevant responses based on the executed commands. When a command is successfully executed, a success message will be displayed. When an invalid command is entered, an error message will be displayed.
3.2. Lists
WedLog simplifies the management of person-based information for your wedding by offering dedicated lists for both guests and vendors.
At the top of each list, you'll find a number indicating the total entries for that list. This real-time count ensures you stay informed about the current size of your guest and vendor lists.
To navigate through your extensive lists, a user-friendly scroll bar is provided.
3.2.1. Guest list
The guest list allows you to meticulously manage and track all information related to your guests.
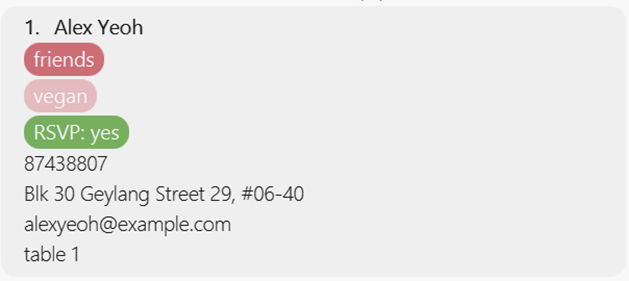
Individualized guest cards present comprehensive details, including tags, dietary requirements, RSVP status, phone numbers, addresses, emails, and assigned table numbers. This organized representation ensures that each guest's information is easily accessible and manageable.
3.2.2. Vendor list
Similar to the guest list, the vendor list serves as a dedicated space for managing the vendors you are liaising with.
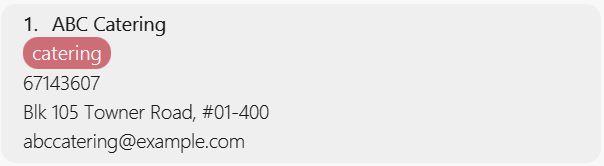
Vendor cards encapsulate key information such as tags, phone numbers, addresses, and emails, providing you with a comprehensive snapshot of each vendor's essential details.
3.3. Quick View Panel
The Quick View panel allows you to see an overview of your guests at a glance. It is located on the left side of the window.
The Quick View panel consists of 2 sections: the RSVP Status panel and the Dietary Requirements panel.
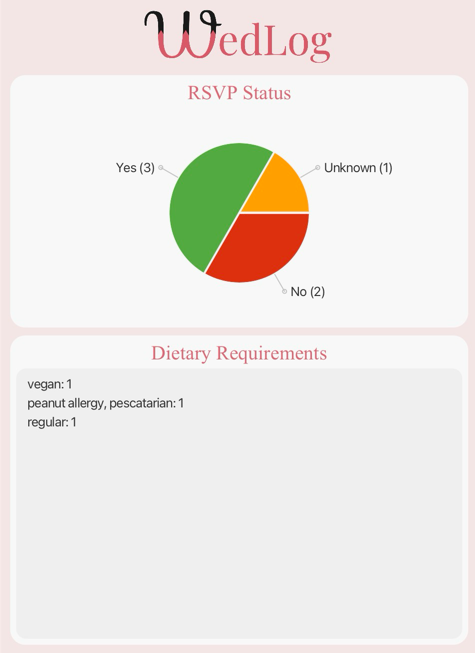
3.3.1. RSVP Status panel
The RSVP Status panel is designed to help you keep track of the proportion of RSVP statuses of your guests. The data is represented using a pie chart, with labels indicating the number of guests with each RSVP status. The pie chart is updated automatically whenever you add, delete or edit a guest.
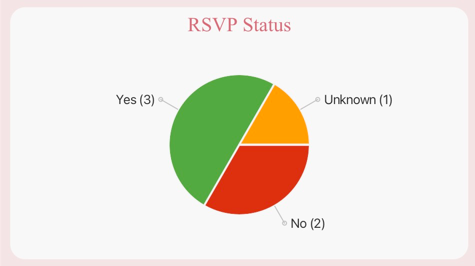
The pie chart slices are colour-coded as follows:
Yes: GreenNo: RedUnknown: Orange
3.3.2. Dietary Requirements panel
The Dietary Requirements panel is designed to help you keep track of your guests' dietary requirements. Whenever you specify a guest to have certain dietary requirements, the requirements will be added to the panel alongside the total number of guests with the same requirements.
This panel consolidates your guests' dietary requirements to be displayed together, for you to consider when planning the menu for your wedding. The panel is also updated automatically whenever you add, delete or edit a guest.
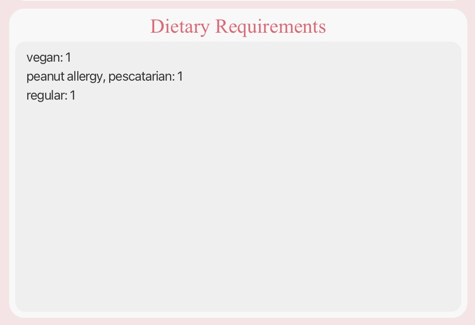
- The panel only displays dietary requirements for guests with RSVP status
yes. This is because guests with RSVP statusnoorunknownare not expected to attend the wedding, and hence do not need to have their dietary requirements taken into account. - If a guest has no specified dietary requirements, we will consider the guest to have
regulardietary requirements. - Dietary requirements are displayed in descending order of the number of guests with the same requirements.
To kick-start your wedding planning journey with WedLog, explore the tutorial in the next section.
4. WedLog Tutorial
Welcome to the WedLog Tutorial! In this section, we'll guide you through the basic commands of WedLog to get you started on your wedding planning journey.
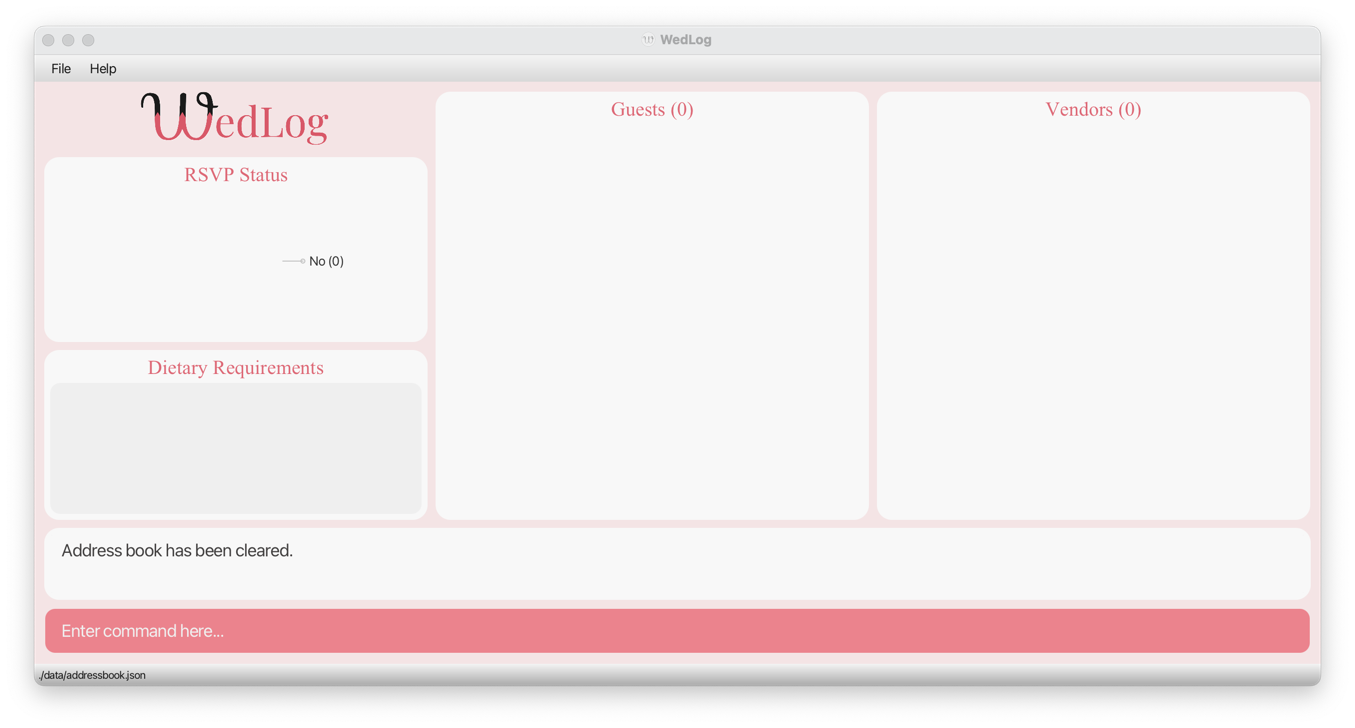
4.1. Clearing guests and vendors
When you first open WedLog, the app contains some sample data. Let's reset the app using the clear command.
Type clear into the command box and press the Enter key. This will delete all the data from both the guest and vendor lists, so that you have a clean slate to work with.
Your app should now look like this:
4.2. Adding a guest
Let's add your first guest to WedLog with the guest add command. Every guest must have a name, and you have the option to include additional details such as a phone number, address, email, and table number. Furthermore, a guest can be associated with multiple tags.
To add a guest named John Doe with the details provided, type the following command and press Enter:
guest add n/John Doe p/91234567 a/15 Sunville Road e/john@example.com tn/1 t/university t/friends
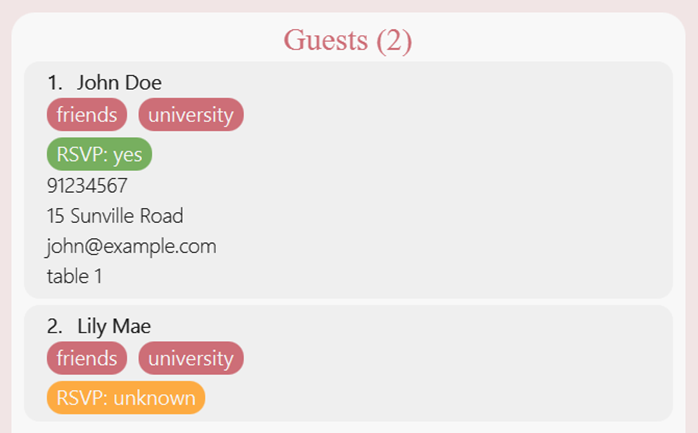
Congratulations! You have successfully added your first guest to your guest list. Your app should now look like this:
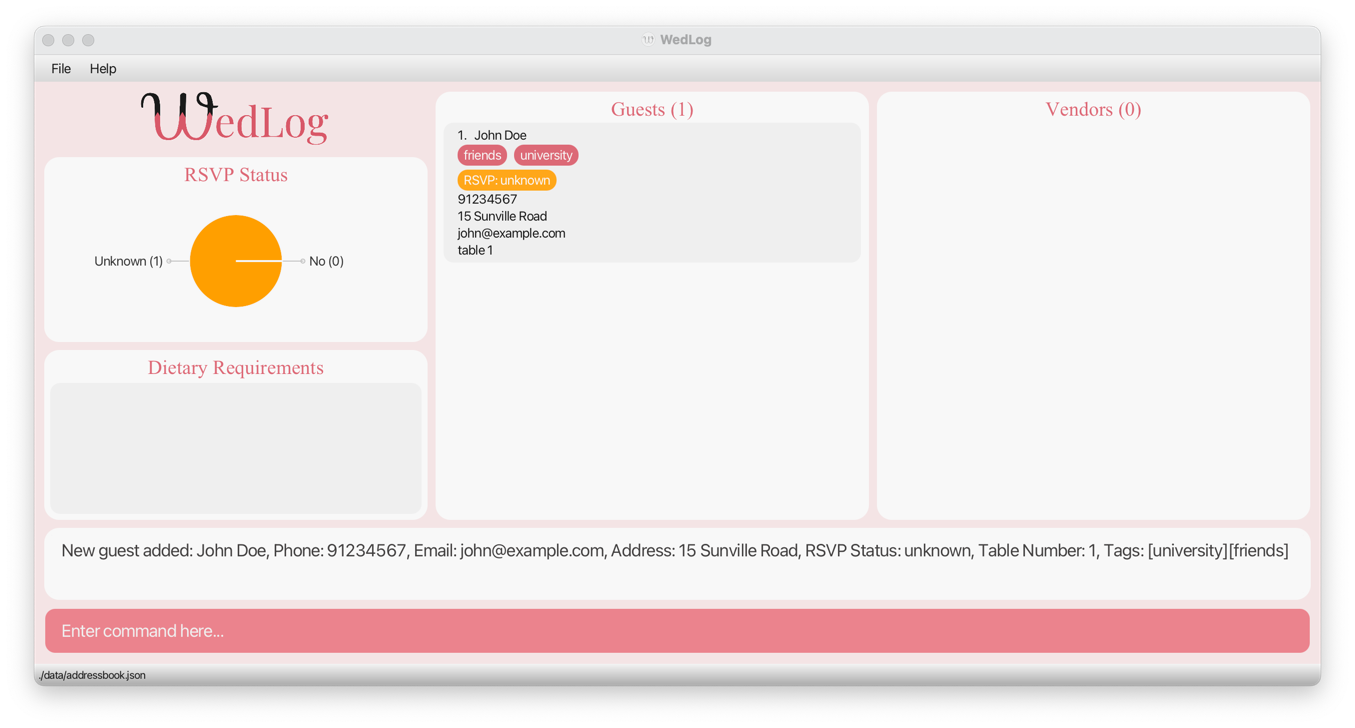
Notice how the default RSVP status for a guest is unknown. We'll learn how to update this in the next section.
4.3. Editing a guest
Let's make adjustments to the details of a guest with the guest edit command. Suppose John Doe has responded to your invite and confirms that he will be attending your wedding. To reflect this, we'll update the RSVP status for John Doe to yes.
Type the following command and press Enter:
guest edit 1 r/yes
Your app should now look like this:
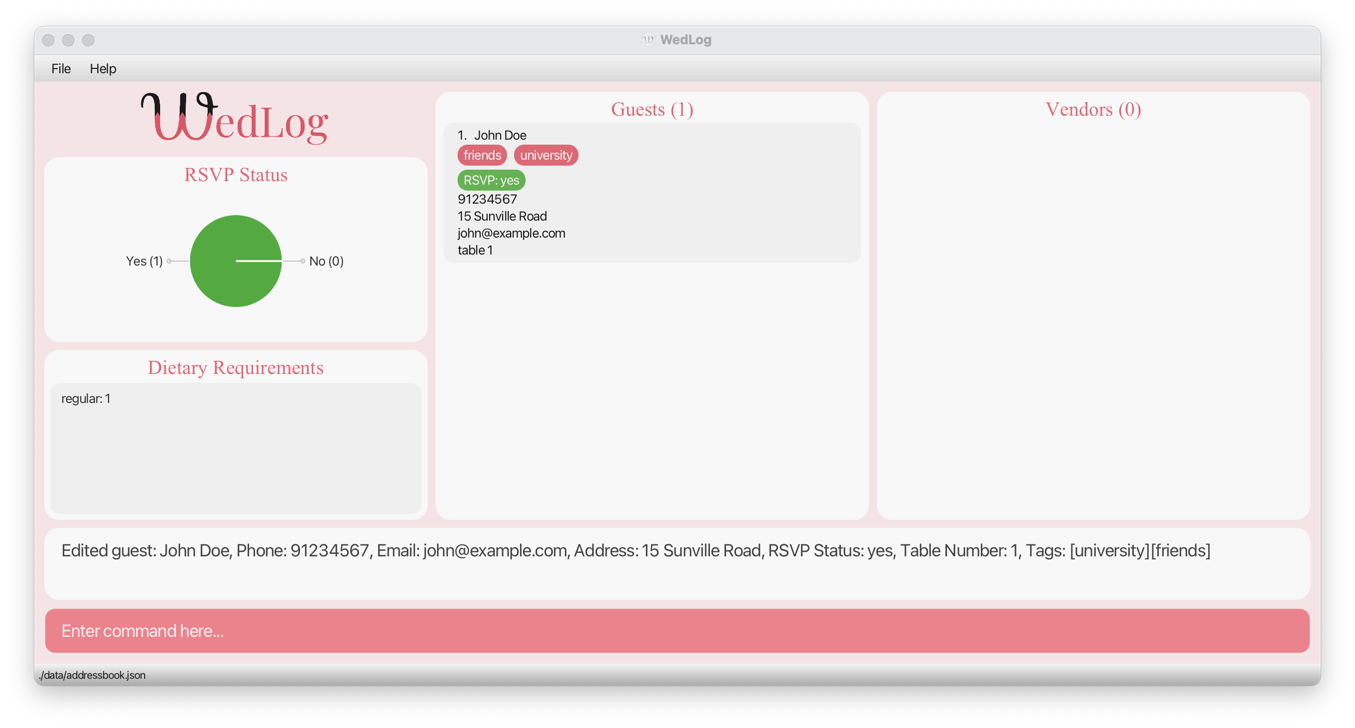
Notice that when a guest confirms their attendance at your wedding, their dietary requirement is automatically included in the dietary requirements panel. In the case of John Doe, since we have not specified any dietary requirements for him, his meal is recorded as the default regular.
This ensures that the tallies on the dietary requirements panel reflect only guests who are confirmed to be attending your wedding.
4.4. Filtering guests
Let's narrow down the guest list based on specific criteria using the guest filter command.
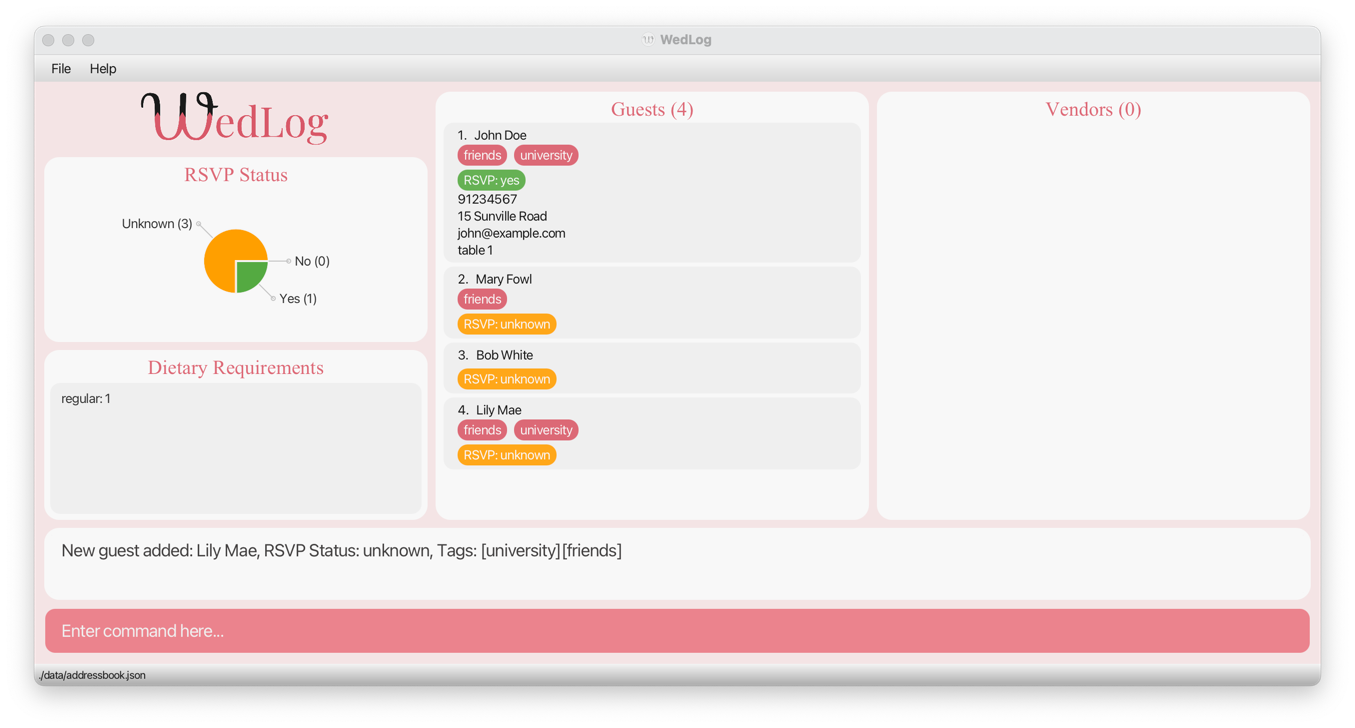
Before we can begin filtering our guests, we must add more guests to the list. Enter each of the following lines one-by-one into WedLog. Each line will add a new guest to the guest list.
guest add n/Mary Fowl t/friends
guest add n/Bob White
guest add t/friends t/university n/Lily Mae
Notice that parameters can be placed in any order. (e.g. Lily Mae's name is specified after the tags)
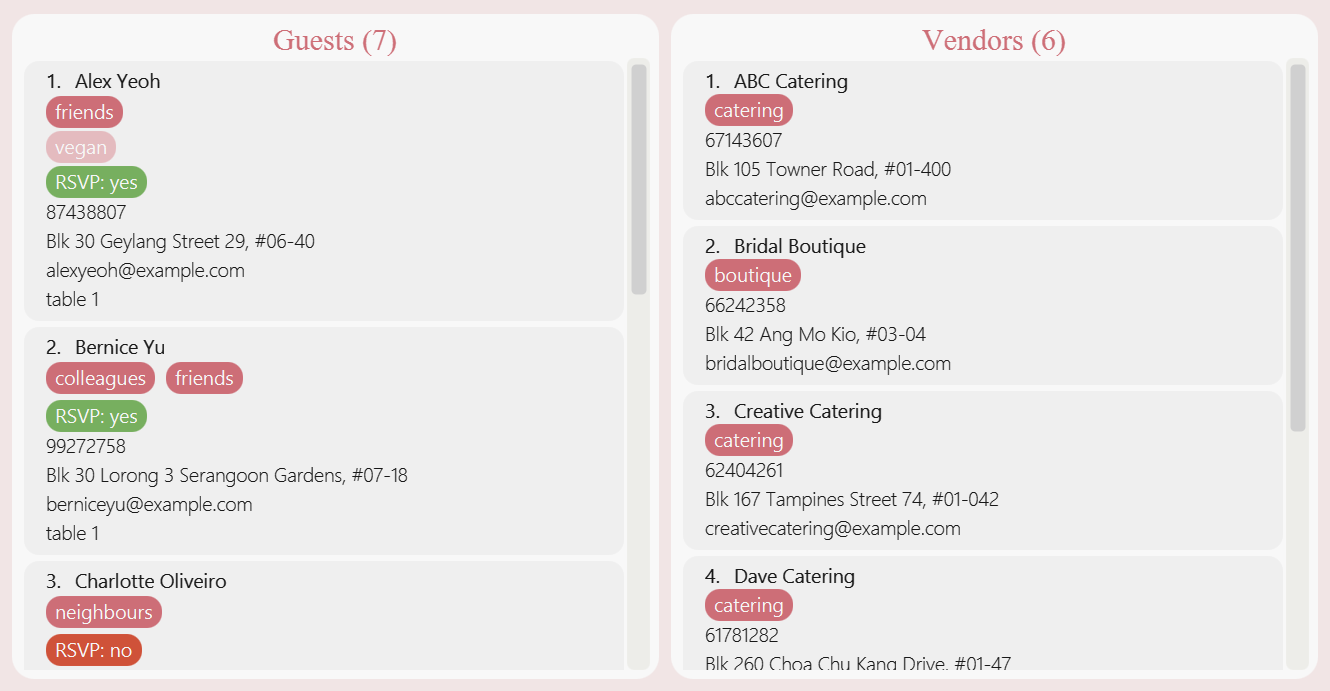
Your app should now look like this:
Now that we have a few guests on our list, let's begin filtering.
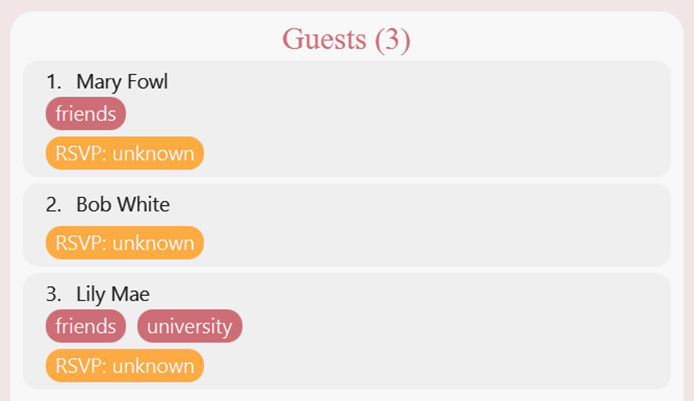
First, let's filter for all guests who are friends. The following command will result in a list that contains only guests with the tag friends.
guest filter t/friends
Your guest list should now look like this:
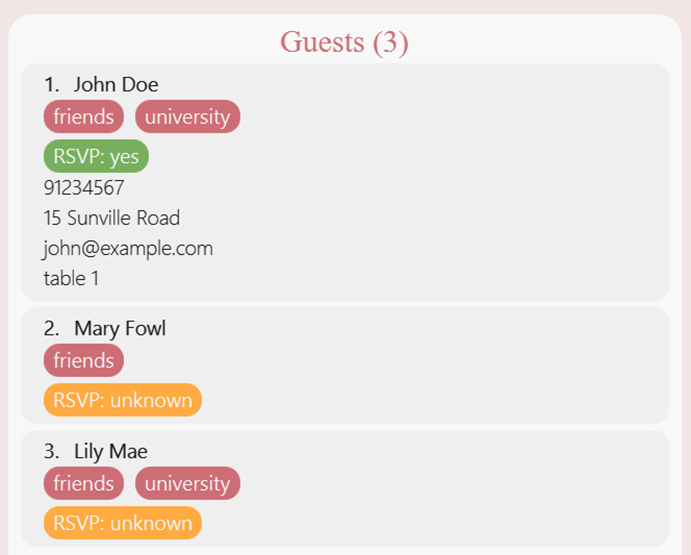
Notice that the number of guests stated at the top of the guest list has changed from 4 to 3, since only 3 guests are displayed in the result of the latest filter command.
Next, let's narrow down our search to filter for all guests who are friends from university. The following command will result in a list that contains only guests with the tags friends and university.
guest filter t/friends t/university
Your guest list should now look like this:
Notice that Mary Fowl is no longer included on this list, since she does not have the university tag.
Finally, let's filter for all guests who have not been assigned to any table yet. We can use the empty tn/ label to look for guests without any table numbers associated to them.
guest filter tn/
Your guest list should now look like this:
Notice that John Doe is not included on this list, since we have previously assigned him to table 1 when we first added him to the guest list.
4.5. What's next?
Congratulations! You've completed the essential steps of the WedLog Tutorial, setting the stage for seamless and organized wedding planning. Armed with the knowledge of adding guests, editing details, and filtering, you're well-equipped to make the most of WedLog.
You can manage your vendors with the same set of commands as guests by replacing the guest keyword with vendor. The only distinction is that vendors require fewer fields for quick and efficient management.
Feel free to explore each command in detail in the features section of this guide. For a quick recap on the commands we've just learnt, check out the command summary.
Happy planning, and may your wedding be everything you've dreamed of!
5. Features
Understanding the parameter format
WedLog employs a standardized parameter format to ensure consistency and accuracy when inputting information. Parameters include names, phone numbers, and other guest or vendor details you wish to track.
Let's breakdown an example parameter x/ABC below.
| Guideline | Example |
|---|---|
Each parameter takes the form x/ABC, where x/ represents the label and ABC is the placeholder value. | n/NAME is the name parameter, where n/ is the label and NAME is the placeholder value. |
| Labels should be used in the exact format described in this guide. | n/ must be typed as n/. Variations such as N/ or name/ are invalid. |
| Placeholder values can be replaced with your own information. | In guest add n/NAME, NAME is a placeholder which can be replaced, as in guest add n/Gina Gan. |
Understanding the command format
Mastering the command format in WedLog is essential for efficient interaction. WedLog's commands allow for flexibility in parameter order and support optional and repeatable elements.
For illustration purposes, let's take a look at the command format for the guest add command:
guest add n/NAME [p/PHONE] [e/EMAIL] [a/ADDRESS] [r/RSVP_STATUS] [tn/TABLE_NUMBER] [d/DIETARY_REQUIREMENT]… [t/TAG]…
Let's break down the command guidelines in the table below:
| Guideline | Example |
|---|---|
| Parameters in square brackets are optional. | n/NAME [t/TAG] can be used as n/Gina Gan t/friend or as n/Gina Gan. |
Parameters with … after them can be used multiple times. | [t/TAG]… can be used as t/friend, or t/friend t/family. |
| Parameters can be in any order. | If the command specifies n/NAME p/PHONE, p/PHONE n/NAME is also acceptable. |
Extra input for commands that do not take in parameters (such as guest list, undo and exit) will be ignored. | If you input help 123, it will be interpreted as help. |
If you are using a PDF version of this document, be careful when copying and pasting commands that span multiple lines as space characters surrounding line-breaks may be omitted when copied over to the application.
5.1 Add Command
5.1.1. Adding a guest: guest add
Allows you to add a guest to WedLog, keeping track of important details such as their RSVP status, dietary requirements, and more.
Format: guest add n/NAME [p/PHONE] [e/EMAIL] [a/ADDRESS] [r/RSVP_STATUS] [tn/TABLE_NUMBER] [d/DIETARY_REQUIREMENT]… [t/TAG]…
Refer to the Appendix for details on the acceptable values for the parameters.
A guest cannot share the same name as another guest. Names are matched on a case-insensitive basis (e.g. gia and Gia will be detected as a duplicate name).
A guest and vendor can share the same name (e.g. Even if there is a vendor named Gia, you are still able to add a guest named Gia).
Examples:
guest add n/Gina p/91234567 a/Blk 123 r/no: Adds a guest namedGinawith phone number91234567, addressBlk 123, and RSVP status ofno.guest add n/Gerald d/ r/: Adds a guest namedGeraldwith no dietary requirements and unknown RSVP status.guest add n/Georgiana Tan t/family t/bridesmaid: Adds a guest namedGeorgianawith two tags,familyandbridesmaid.
Expected behaviour upon success:
- Adds the guest.
- Displays a message showing the added guest.
Expected behaviour upon failure:
- Not providing the
NAMEparameter: Displays in the error message “Invalid command format!” followed by instruction onguest addusage. - Adding a new guest with the same
NAMEas an existing guest: Displays the error message "This guest already exists in WedLog." - Providing invalid values for parameters with input restrictions will also trigger error messages.
5.1.2. Adding a vendor: vendor add
Allows you to add a vendor to WedLog, so that you can streamline coordination with the people involved in making your dream wedding a reality.
Format: vendor add n/NAME [p/PHONE] [e/EMAIL] [a/ADDRESS] [t/TAG]…
Refer to the Appendix for details on the acceptable values for the parameters.
A vendor cannot share the same name as another vendor. Names are matched on a case-insensitive basis (e.g. valerie and Valerie will be detected as a duplicate name).
A person can be recorded as both a guest and vendor. (e.g. Even if there is a guest named Gia, you are also able to add a vendor named Gia)
Examples:
vendor add n/Valerie Tan p/91234567 a/12 Buona Vista St: Adds a vendor namedValerie Tanwith phone number91234567and address12 Buona Vista St.vendor add n/Victor Wong e/victorwflowers@email.com t/florist t/photographer: Adds a vendor namedVictor Wongwith the emailvictorwflowers@email.comand the tagsfloristandphotographer.
Expected behaviour upon success:
- Adds a vendor to the vendor list.
- Displays the vendor that has been added.
Expected behaviour upon failure:
- Not providing the
NAMEparameter: Displays in the error message “Invalid command format!” followed by instruction onvendor addusage. - Adding a new vendor with the same
NAMEas an existing vendor: Displays in the error message "This vendor already exists in WedLog." - Providing invalid values for parameters with input restrictions will also trigger error messages.
5.2. Delete Command
5.2.1. Deleting a guest: guest delete
Allows you to delete a guest from WedLog, so that you can tackle last-minute changes and refine your guest list with ease.
Format: guest delete INDEX
INDEX must be a positive integer. (e.g. 1, 2, 3…)
Examples:
guest delete 2deletes the 2nd guest on the guest list.guest filter n/Ginafollowed byguest delete 1deletes the 1st guest in the results of thefiltercommand.
Expected behaviour upon success:
- Deletes the guest at the specified
INDEX. - Displays a message telling user which guest has been deleted.
INDEX refers to the index number of the guest currently displayed on the guest list.
Expected behaviour upon failure:
- Number out of index range: Displays error message "The guest index provided is invalid."
- Input for index not a number, or no number: Displays error message "Invalid command format!" followed by instruction on guest delete usage.
5.2.2. Deleting a vendor: vendor delete
Allows you to delete a vendor from WedLog, so that you can tailor your dream team to match your evolving wedding vision.
Format: vendor delete INDEX
INDEX must be a positive integer. (e.g. 1, 2, 3…)
Examples:
vendor listfollowed byvendor delete 2deletes the 2nd vendor on the vendor list.vendor filter n/Valenciafollowed byvendor delete 1deletes the 1st vendor in the results of thefiltercommand.
Expected behaviour upon success:
- Deletes the vendor at the specified
INDEX. - Displays a message telling user which vendor has been deleted.
INDEX refers to the index number of the vendor currently displayed on the vendor list.
Expected behaviour upon failure:
- Number out of index range: Displays error message "The vendor index provided is invalid."
- Input for index not a number, or no number: Displays error message "Invalid command format!" followed by instruction on vendor delete usage.
5.3. Edit Command
5.3.1. Editing a guest: guest edit
Allows you to edit a guest's details, so that you can keep track of the latest information about your guests.
Format: guest edit INDEX [n/NAME] [p/PHONE] [e/EMAIL] [a/ADDRESS] [r/RSVP_STATUS] [tn/TABLE_NUMBER] [d/DIETARY_REQUIREMENT]… [t/TAG]…
Parameter information:
INDEXmust be a positive integer. (e.g. 1, 2, 3…)- Specifying an empty parameter (e.g.
p/) will delete the parameter's value from the guest. - At least one parameter must be specified in an edit command.
Refer to the Appendix for more details on the acceptable values for the parameters.
The edited NAME cannot correspond to an existing guest in WedLog.
INDEX refers to the index number of the guest currently displayed on the guest list.
Examples:
guest listfollowed byguest edit 2 p/914624435edits the phone number of the 2nd guest to be91462435.guest filter n/Ginafollowed byguest edit 1 n/Ginetteedits the name of the 1st guest in the results of thefiltercommand to beGinette.
Expected behaviour upon success:
- Edits the guest at the specified
INDEX. - Displays the guest that has been edited.
Expected behaviour upon failure: (in order of priority)
- Index is not a number, or no index provided: Displays error message "Invalid command format!" followed by instruction on guest edit usage.
- No parameters provided: Displays error message "At least one field to edit must be provided."
- Index does not correspond to any guest: Displays error message "The guest index provided is invalid."
5.3.2. Editing a vendor: vendor edit
Allows you to edit a vendor's details, so that you can keep track of the latest information about your vendors.
Format: vendor edit INDEX [n/NAME] [p/PHONE] [e/EMAIL] [a/ADDRESS] [t/TAG]…
Parameter information:
INDEXmust be a positive integer. (e.g. 1, 2, 3…)- Specifying an empty parameter (e.g.
p/) will delete the parameter's value from the vendor. - At least one parameter must be specified in an edit command.
Refer to the Appendix for more details on the acceptable values for the parameters.
The edited NAME cannot correspond to an existing vendor in WedLog.
INDEX refers to the index number of the vendor currently displayed on the vendor list.
Examples:
vendor listfollowed byvendor edit 2 p/914624435edits the phone number of the 2nd vendor to be91462435.vendor filter n/Valeriefollowed byvendor edit 1 n/Valedits the name of the 1st vendor in the results of thefiltercommand to beVal.
Expected behaviour upon success:
- Edits the vendor at the specified
INDEX. - Displays the vendor that has been edited.
Expected behaviour upon failure: (in order of priority)
- Index is not a number, or no index provided: Displays error message "Invalid command format!" followed by instruction on vendor edit usage.
- No parameters provided: Displays error message "At least one field to edit must be provided."
- Index does not correspond to any guest: Displays error message "The vendor index provided is invalid."
5.4. List Command
5.4.1. Viewing all guests: guest list
Allows you to view all guests in WedLog, so that you can see the big picture that is your entire guest list.
Format: guest list
Expected behaviour upon success:
- Displays a list of all guest names and their respective indexes.
- Example: 1. Gina Tan, 2. Gabriel Lim
- If there is one or more guests, displays the message "Listed all guests". Else, displays the message "No guests recorded".
5.4.2. Viewing all vendors: vendor list
Allows you to view all vendors in WedLog, so that you can see all the people involved in making your dream wedding a reality.
Format: vendor list
Expected behaviour upon success:
- Displays a list of all vendor names and their respective indexes.
- Example: 1. Valerie Tan, 2. Victor Lim
- If there is one or more vendors, displays the message "Listed all vendors". Else, displays the message "No vendors recorded".
5.5. Filter Command
5.5.1. Filtering guests: guest filter
Allows you to filter guests by their details and more, so that you can pick out details that matter to you and your guests and zoom in to your guest list accordingly.
Format: guest filter [n/NAME] [p/PHONE] [e/EMAIL] [a/ADDRESS] [r/RSVP_STATUS] [tn/TABLE_NUMBER] [d/DIETARY_REQUIREMENT]… [t/TAG]…
Parameter information:
- You can use any combination of letters, numbers and special characters as inputs for all parameters.
- For all parameters aside from
NAMEandRSVP_STATUS, providing an empty value (e.g.p/) will filter for guests with unfilled values for that parameter. - Providing an empty
RSVP_STATUSwill filter for guests with RSVP statusunknown. - Providing an empty
NAMEwill filter for guests without a name, thus returning an empty guest list as all guests need a name. - At least one parameter must be specified in a filter command.
The filter command will only return guests that match all the input values across different parameters.
Examples:
guest filter n/Gia r/no: filters for guests withGiain their names who have RSVP status ofno. Results might includeGia Lee, RSVP: noandGianna Tan, RSVP: no.guest filter d/: filters for guests with no dietary requirements.guest filter t/: filters for guests with no tags.guest filter d/no beef d/no pork: filters for all guests who are tagged with bothno beefandno porkin their dietary requirements field.
Expected behaviour upon success:
- Displays a list of guests that match all the inputted values.
- Displays a message showing the total number of results found.
Expected behaviour upon failure:
- No parameter (e.g.
guest filter): Displays error message "No prefix was found in the command!" followed by instruction on guest filter usage.
5.5.2. Filtering vendors: vendor filter
Elevate your wedding curation with precision. Filter vendors by their details and more, allowing you to manage crucial arrangements and allocation with ease.
Allows you to filter vendors by their details and more, so that you can manage arrangements and allocations and zoom in to your vendor list accordingly.
Format: vendor filter [n/NAME] [p/PHONE] [e/EMAIL] [a/ADDRESS] [t/TAG]…
Parameter information:
- You can use any combination of letters, numbers and special characters as inputs for all parameters.
- For all parameters aside from
NAME, providing an empty value (e.g.p/) will filter for vendors with unfilled values for that parameter. - Providing an empty
NAMEwill filter for vendors without a name thus returning an empty vendors list as all vendors need a name. - At least one parameter must be specified in a filter command.
The filter command will only return vendors that match all the input values across different parameters.
Examples:
vendor filter n/Val: Filter for all vendors with "Val" in their names. Results may includeVal Tan, tag: PhotographerandValerie Lee, tag: Florist.vendor filter t/photographer t/dj: Filter for all vendors tagged as bothphotographeranddj. Results may includeVeronica, tags: photographer, dj, but notVictor, tags: photographerandValen, tags: photographer, djay.vendor filter p/: filter for all vendors with empty phone numbers.
Expected behaviour upon success:
- Displays a list of vendors that match all the inputted values.
- Displays a message showing the total number of results found.
Expected behaviour upon failure:
- No parameter (e.g.
vendor filter): Displays error message "No prefix was found in the command!" followed by instruction on vendor filter usage.
5.6. General Commands
5.6.1. Viewing help: help
Allows you to access the URL to our user guide at any time, in case you need to refer to it.
Format: help
5.6.2. Undoing last action: undo
Allows you to undo the last action, so that you can correct mistakes and keep your wedding planning on track.
Format: undo
The undo command can also be triggered by pressing Control + Z (Windows) or Command + Z (Mac) on the keyboard.
Examples:
vendor delete 2followed byundodeletes, then restores the 2nd vendor in WedLog.
Expected behaviour upon success:
- Restores WedLog to its previous state.
Expected behaviour upon failure:
- No states to undo: Displays error message “There is no change to undo!”
5.6.3. Redoing last action: redo
Allows you to redo the last action, so that you can correct mistakes and keep your wedding planning on track.
Format: redo
The redo command can be triggered by pressing Control + Y (Windows) or Command + Y (Mac) on the keyboard.
Examples:
vendor delete 2, followed byundo, followed byredodeletes, then restores, then re-deletes the 2nd vendor in WedLog.
Expected behaviour upon success:
- Restores WedLog to its previous state before the last undo.
Expected behaviour upon failure:
- No states to redo: Displays error message “There is no change to redo!”
5.6.4. Clearing guests and vendors: clear
Allows you to clear the guest and vendor lists, so that you can start planning your wedding from a clean slate.
format: clear
Expected behaviour upon success:
- Removes all guest and vendors in the guest and vendor lists respectively.
If you have mistakenly cleared the lists, use the undo command to restore all your data.
5.6.5. Exiting the program: exit
Allows you to exit the program, so that you can wrap up your planning session seamlessly and pick up where you left off next time.
Format: exit
Upon exit, the latest data is saved to your computer at data/addressbook.json.
6. FAQ
Q: How do I transfer my data to another Computer?
A: Install WedLog on the other computer and replace the data file it creates with your existing data file. This data file
can be located in your existing WedLog home folder.
Q: Is there somewhere I can refer to all the commands at one glance?
A: You may refer to our command summary section for a quick overview of all the commands available in WedLog.
Q: I accidentally deleted my data file. How can I recover my lost data?
A: Please try looking for the deleted file in your computer's recycle bin. Once located, simply move the file from the recycle bin into the same folder as the wedlog.jar file.
Unfortunately, in the event that you cannot locate the deleted file in your recycle bin, we are
unable to help you recover your lost data.
Q: Can I use WedLog without an internet connection?
A: Yes, the WedLog application does not require internet connection to run.
Q: My wedding is over. How can I remove WedLog from my computer?
A: We hope you had a good wedding planning journey with WedLog! If you placed WedLog inside a dedicated folder during the installation process,
simply delete the entire folder. Otherwise, you will have to find and delete the following files individually: wedlog.jar, addressbook.log.0, preferences.json, config.json, alongside the data folder.
7. Known Issues
- When using multiple screens, if you move the application to a secondary screen, and later switch to using only the primary screen, the GUI will open off-screen. The remedy is to delete the
preferences.jsonfile created by the application before running the application again.
8. Future Implementations
guest clearandvendor clearfeatures will be implemented in the future. This feature will allow users to clear the guest list or vendor list quickly.
9. Command Summary
| Action | Format | Example |
|---|---|---|
| Add a guest | guest add n/NAME [p/PHONE] [e/EMAIL] [a/ADDRESS] [r/RSVP_STATUS] [tn/TABLE_NUMBER] [d/DIETARY_REQUIREMENT]… [t/TAG]… | guest add n/John Doe p/98765432 e/john@doe.com a/Street 456 r/unknown d/vegetarian t/friend |
| Add a vendor | vendor add n/NAME [p/PHONE] [e/EMAIL] [a/ADDRESS] [t/TAG]… | vendor add n/Betsy p/91234567 |
| Delete a guest | guest delete INDEX | guest delete 1 |
| Delete a vendor | vendor delete INDEX | vendor delete 2 |
| Edit a guest | guest edit INDEX [n/NAME] [p/PHONE] [e/EMAIL] [a/ADDRESS] [r/RSVP_STATUS] [tn/TABLE_NUMBER] [d/DIETARY_REQUIREMENT]… [t/TAG]… | guest edit 1 p/98765432 r/unknown |
| Edit a vendor | vendor edit INDEX [n/NAME] [p/PHONE] [e/EMAIL] [a/ADDRESS] [t/TAG]… | vendor edit 2 p/914624435 |
| View all guests | guest list | |
| View all vendors | vendor list | |
| Filter guests | guest filter [n/NAME] [p/PHONE] [e/EMAIL] [a/ADDRESS] [r/RSVP_STATUS] [d/DIETARY_REQUIREMENTS] [tn/TABLE_NUMBER] [t/TAG]… | guest filter n/Keith p/92354567 r/yes |
| Filter vendors | vendor filter [n/NAME] [p/PHONE] [e/EMAIL] [a/ADDRESS] [t/TAG]… | vendor filter n/John Doe p/91234567 e/johndflowers@email.com a/123 Flower Lane |
| View help | help | |
| Undo last action | undo | |
| Redo last action | redo | |
| Clear guests and vendors | clear | |
| Exit program | exit |
10. Appendix: Acceptable values for parameters
Definitions:
- Word: Any letters, numbers or special characters of length 1 or more (non-blank).
- Alphanumeric word: Any letters or numbers of length 1 or more (non-blank).
| Parameters | Requirements |
|---|---|
n/NAME | Alphanumeric word with or without spaces and should not be blank. |
p/PHONE | Numbers with no spaces or special characters. It must contain at least 3 numbers. |
e/EMAIL | Valid email in the form local-part@domain (e.g. johndoe@example.com) |
a/ADDRESS | Word with or without spaces and should not be blank. |
r/RSVP_STATUS | Either yes, no, or unknown only. |
d/DIETARY_REQUIREMENT | Alphanumeric word with or without spaces and should not be blank. |
tn/TABLE_NUMBER | Numbers with no spaces or special characters. |
t/TAG | Alphanumeric word with no spaces. |